
Concrete Column / Post Calculator
Calculate concrete for round, square & rectangular columns
Table of Contents
What Is a Concrete Column Calculator?
A concrete column calculator estimates how much concrete you need to pour vertical columns, posts, piers, and Sonotube footings. You enter the column shape (round, square, or rectangular), dimensions, height, and quantity — and the calculator returns total cubic yards, bag count, weight, and cost. If a wood or steel post sits inside the column, it subtracts the post volume so you do not over-order.
Columns are different from slabs because the volume per unit is small but the quantity is often high. A single 12-inch Sonotube at 4 feet deep holds only 0.12 cubic yards — but 8 of them for a deck project totals nearly 1 cubic yard. Getting the per-column volume right and multiplying correctly is where most DIYers make mistakes.
Our concrete column calculator gives you features no competitor offers:
- 3 column shapes — Round (cylinder/Sonotube), square (pier/post), and rectangular (structural). Each uses the correct formula automatically.
- Sonotube preset sizes — Select from 6″ to 24″ standard tube diameters with one click instead of measuring and entering manually.
- Post displacement subtraction — If a 4×4, 6×6 wood post or steel pipe sits inside the concrete, the calculator subtracts its volume so you order the right amount.
- Per-column and total breakdown — See volume, bags, and weight for each individual column and the entire project.
- Instant results with live preview — The SVG diagram shows your columns and updates as you type. No “Calculate” button.
How to Calculate Concrete for Columns (Step-by-Step)
Step 1: Choose Your Column Shape
Most residential columns fall into one of three shapes:
- Round (cylinder) — The most common. Used for Sonotube footings, deck piers, porch columns, fence post holes, and any tube-formed pour. Volume = π × radius² × height.
- Square — Used for masonry piers, wood-post footings, and decorative columns. Volume = side × side × height.
- Rectangular — Used for structural columns, foundation piers, and custom supports where width and depth differ. Volume = width × depth × height.
Tip: A square column holds about 27% more concrete than a round column of the same nominal width. A 12-inch round column at 4 feet tall uses 3.14 ft³. A 12×12-inch square column at the same height uses 4.0 ft³. Choose your shape before calculating — it matters.
Step 2: Measure the Dimensions
For round columns, measure the inside diameter of the tube form — not the outside. A standard 12-inch Sonotube has an inside diameter of approximately 11.5–12 inches depending on the manufacturer. Using the outside diameter overestimates volume by 5–10%.
For square and rectangular columns, measure the inside dimensions of the form — the space the concrete will fill, not the lumber or plywood dimensions.
Height means the total vertical pour distance in feet. For footings, this is the hole depth. For above-grade columns, this is the finished column height.
Step 3: Count Your Columns
Enter the total number of identical columns. The calculator multiplies the per-column volume by your quantity. If you have columns of different sizes, calculate each size group separately and add the totals.
Step 4: Subtract the Post (If Applicable)
When setting a fence post or deck post in concrete, the post itself displaces concrete inside the hole. A 4×4 wood post (actual size 3.5×3.5 inches) inside a 12-inch hole displates about 0.34 ft³ of concrete over 4 feet. That is nearly half a bag of 80 lb concrete per post — and across 20 fence posts, it adds up to 10 fewer bags than a calculator without post subtraction would tell you.
Step 5: Add Waste and Order
Add 10% waste for standard column work. Column pours have less spillage than slabs (the forms contain the concrete), but you still lose material to mixing, the bottom of the hole absorbing moisture, and slight over-fill at the top.
Sonotube Sizes and Concrete Volume Reference
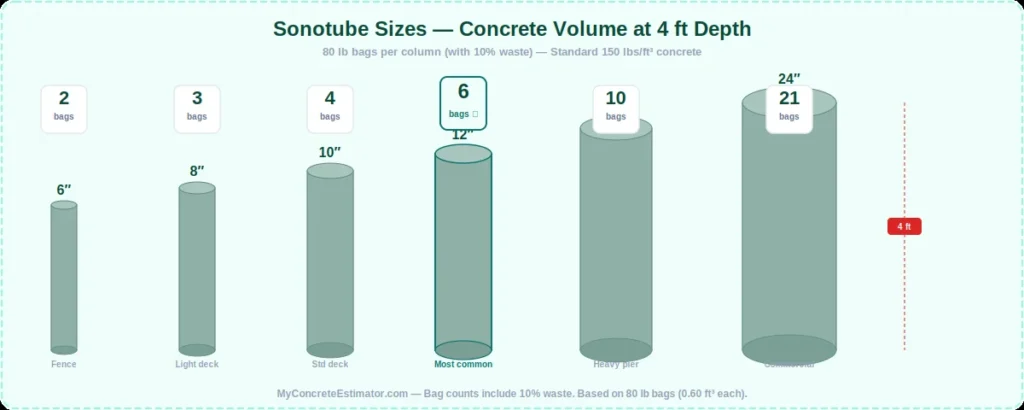
Sonotube (also called cardboard tube forms or fiber forms) is the standard forming method for round concrete columns and footings. Here is how much concrete each standard size holds per foot of height:
| Sonotube Diameter | Volume per Foot (ft³) | 4 ft Column (ft³) | 4 ft Column (yd³) | 80 lb Bags per Column | Common Use |
|---|---|---|---|---|---|
| 6″ | 0.20 | 0.79 | 0.029 | 2 | Fence posts, mailbox posts |
| 8″ | 0.35 | 1.40 | 0.052 | 3 | Light deck posts, sign posts |
| 10″ | 0.55 | 2.18 | 0.081 | 4 | Standard deck posts, pergola piers |
| 12″ | 0.79 | 3.14 | 0.116 | 6 | Heavy deck piers, porch columns |
| 14″ | 1.07 | 4.28 | 0.158 | 8 | Structural piers, heavy-load columns |
| 16″ | 1.40 | 5.59 | 0.207 | 10 | Large structural piers, bridges |
| 18″ | 1.77 | 7.07 | 0.262 | 12 | Heavy structural, commercial |
| 24″ | 3.14 | 12.57 | 0.466 | 21 | Large commercial piers, bridges |
Quick rule: For a 12-inch Sonotube at 4 feet deep, budget 6 bags of 80 lb concrete per column. This is the most common residential size for deck footings and porch piers.
Concrete for Fence Posts and Deck Posts
Post-hole concrete is the most common DIY column project. Here is how much concrete you need for standard post installations:
| Post Type | Hole Diameter | Hole Depth | Post Size | Concrete per Post (ft³) | 80 lb Bags per Post |
|---|---|---|---|---|---|
| 4 ft fence post | 8″ | 2 ft | 4×4 | 0.53 | 1 |
| 6 ft fence post | 10″ | 2.5 ft | 4×4 | 1.13 | 2 |
| 8 ft fence post | 10″ | 3 ft | 4×4 | 1.37 | 3 |
| Deck post | 12″ | 4 ft | 6×6 | 2.30 | 4 |
| Pergola post | 14″ | 3.5 ft | 6×6 | 3.15 | 6 |
| Mailbox post | 8″ | 2 ft | 4×4 | 0.53 | 1 |
These figures already subtract the wood post displacement. The rule of thumb for fence post depth is one-third of the total post height plus 6 inches for a gravel base. An 8-foot fence post should be buried at least 2.5–3 feet deep.
Column Depth and Frost Line Requirements
Any load-bearing column footing must extend below the local frost line to prevent frost heave — the ground freezing underneath the footing and pushing it upward. Here are frost line depths for major US regions:
| Region | Typical Frost Line | Minimum Footing Depth | Cities |
|---|---|---|---|
| South / Gulf Coast | 0–6″ | 12″ minimum (code) | Houston, Miami, Phoenix, Atlanta |
| Mid-Atlantic | 24–36″ | 30–42″ | Washington DC, Philadelphia, Richmond |
| Midwest | 36–48″ | 42–54″ | Chicago, Indianapolis, Kansas City |
| Northeast | 36–48″ | 42–54″ | Boston, New York, Pittsburgh |
| Upper Midwest / Mountains | 48–72″ | 54–78″ | Minneapolis, Denver, Anchorage |
Always check your local building code. The International Residential Code (IRC) requires footings to extend at least 12 inches below grade regardless of frost line, but most jurisdictions set a deeper local requirement. Your building department can give you the exact frost depth for your ZIP code.
Round vs Square Columns: Volume and Cost Comparison
| Feature | Round (Sonotube) | Square (Built Form) |
|---|---|---|
| Volume (12″ × 4 ft) | 3.14 ft³ (0.116 yd³) | 4.00 ft³ (0.148 yd³) |
| 80 lb bags (same dims) | 6 bags | 7 bags |
| Form cost | $8–$15 per tube | $5–$12 in lumber (reusable) |
| Form ease | Very easy — set tube in hole, level, pour | Moderate — build, brace, level, pour, strip |
| Strength (structural) | Higher — no corner stress concentrations | Slightly lower — corners are weak points |
| Appearance | Smooth cylindrical finish | Flat faces — can match rectangular structures |
| Best for | Deck piers, fence posts, any below-grade footing | Above-grade piers, decorative columns, masonry |
So, round Sonotube columns are the best method for most residential footings because they use 21% less concrete than square columns of the same width, the forms are cheap and disposable, and installation is faster. Use square columns when appearance matters (above-grade decorative work) or when the column must match a rectangular structural element.
Tips for Pouring Concrete Columns
Use the inside diameter for Sonotube calculations. A “12-inch” Sonotube has a wall thickness of about 0.25 inches, making the inside diameter roughly 11.5 inches. Using the outside diameter overestimates concrete by 5–10% per column — across 8 columns, that is nearly a full extra bag you do not need.
Set the tube plumb before pouring. A column that is 1 inch off plumb at the bottom is 3+ inches off at the top of a 4-foot pour. Use a spirit level on two sides, brace with 2×4 stakes, and check plumb again after the first lift of concrete. Once the concrete starts to set, you cannot adjust.
Pour in 12–18 inch lifts. Do not dump the entire column’s concrete in at once — the hydrostatic pressure can blow out the bottom of a Sonotube or push built forms apart. Pour 12–18 inches, rod or vibrate to remove air pockets, then pour the next lift.
Rod each lift with a piece of rebar. Push a 3-foot piece of rebar up and down through each lift 15–20 times to consolidate the concrete and remove trapped air. This takes 30 seconds per lift and dramatically reduces honeycomb voids.
Slope the top of post footings. When setting a wood post in concrete, shape the top of the concrete to slope away from the post at about 15 degrees. This sheds water away from the wood-to-concrete joint, which is the most common rot point on fence and deck posts.
Add a gravel base before the tube. Place 4–6 inches of compacted gravel at the bottom of the hole before setting the Sonotube. This provides drainage under the footing so water does not pool and freeze beneath the concrete in winter.
Wait 24–48 hours before loading. Concrete reaches only about 25% of its design strength in the first 24 hours. Do not attach beams, joists, or fencing to column footings until at least 48 hours after the pour — 7 days is better for structural loads.
Cut Sonotubes to the right height before pouring. Mark the desired height on the tube, then cut with a reciprocating saw or handsaw. It is much easier to cut a dry tube than to try to screed wet concrete at the right level inside a tube that is too tall.
Plan your pour sequence. If you have 8 columns, mix enough concrete for 2 at a time, pour and rod them, then move to the next pair. This keeps your working time under 20 minutes per batch — well within the concrete’s workable window.
Always check frost line depth before digging. A footing that does not extend below the frost line will heave — potentially cracking the column and whatever it supports. Your local building department can provide the exact frost depth for your location. Most codes require the bottom of the footing to sit at least 6 inches below the frost line.
Comparison Table: Column Calculation Methods
| Method | Accuracy | Post Displacement | Speed | Best For |
|---|---|---|---|---|
| Online Calculator (this tool) | High | Yes — subtracts post | Instant | Any column project — fast, free, visual |
| Manual formula (π × r² × h) | High | Manual only | 2–5 min | Quick field check for round columns |
| Sonotube bag chart (on packaging) | Medium | No | 10 sec | Rough estimate — does not account for post or waste |
| Supplier bag calculator (Quikrete app) | Medium | Some | 1–2 min | Brand-specific bag counts |
| Contractor estimate | Highest | Yes | 1–3 days | Large or structural column projects |
So, an online column calculator is the best method for DIY planning because it handles multiple shapes, subtracts post displacement, and gives you per-column and total results in one step. For structural columns supporting significant loads, always verify dimensions with an engineer.
A 12-inch Sonotube at 4 feet deep needs approximately 6 bags of 80 lb concrete (3.14 cubic feet of volume). At 3 feet deep, you need about 4–5 bags. Add 10% waste to be safe — so budget 7 bags for a 4-foot column.
Use the cylinder formula: Volume = π × (diameter ÷ 2)² × height. Convert the diameter from inches to feet first (divide by 12). For a 12-inch diameter column at 4 feet tall: π × 0.5² × 4 = 3.14 cubic feet = 0.116 cubic yards. Multiply by the number of columns for the total.
A standard fence post hole (10-inch diameter, 2.5 feet deep, with a 4×4 post inside) needs about 2 bags of 80 lb concrete per post. For a 50-foot fence with posts every 8 feet, that is 7 posts × 2 bags = 14 bags total. Use our calculator with post displacement turned on for exact numbers.
Yes — a square column uses about 27% more concrete than a round column of the same nominal width. A 12-inch round column at 4 feet holds 3.14 ft³ while a 12×12-inch square column holds 4.0 ft³. Round columns (Sonotube) are more material-efficient for most residential footings.
At minimum, the footing must extend below the local frost line — typically 12 inches in the South, 36–48 inches in the Midwest/Northeast, and up to 72 inches in northern states. Check your local building code for the exact requirement. The bottom of the footing should sit at least 6 inches below the frost line.
Most residential decks use 10-inch or 12-inch Sonotubes. A 10-inch tube is adequate for light decks (under 200 sq ft) with posts spaced 6 feet apart. A 12-inch tube handles heavier loads and longer spans. For multi-level or heavily loaded decks, your building permit may require 14-inch or larger tubes — check with your building department.
Always use the inside diameter — that is the space the concrete actually fills. A “12-inch” Sonotube has about 0.25 inches of wall thickness, so the inside diameter is roughly 11.5 inches. Using the outside diameter overestimates volume by 5–10% per column.
Wait at least 48 hours before attaching beams or structural loads to concrete column footings. Concrete reaches about 50% of its design strength at 3 days and 70% at 7 days. For full structural loads (decks, pergolas, additions), waiting 7 days is best practice. In cold weather (below 50°F), double the wait time.
For most residential footings (fence posts, mailbox posts, light deck piers), rebar is not required — the concrete column is primarily resisting compressive loads. For structural columns supporting significant weight (multi-level decks, porches, additions), building codes typically require vertical rebar (#4 or #5) with horizontal ties. Check your local building code and structural plans.
Yes, but with precautions. Concrete should not freeze within the first 24 hours — if the temperature will drop below 32°F, use hot water in the mix, cover the columns with insulating blankets, and consider an accelerator additive. Do not pour if sustained temperatures will stay below 20°F. Cold-weather pours take 2–3 times longer to reach design strength.
For a standard 4×4 fence post with a 10-inch diameter hole at 2.5 feet deep, you need about 2 bags of 80 lb concrete per post (after subtracting the post volume). For a deeper hole at 3 feet, budget 2–3 bags per post. Our calculator subtracts the post displacement automatically.
A column is the vertical concrete element that transfers load downward. A footing is the wider base at the bottom of the column that spreads the load over a larger soil area. In residential work, “column” and “footing” are often used interchangeably — a Sonotube pier is technically both a column and its own footing in one pour. Structural columns on commercial buildings have separate spread footings beneath them.
A 12-inch round column at 4 feet tall weighs approximately 471 lbs (3.14 ft³ × 150 lbs/ft³). A 10-inch column at the same height weighs about 327 lbs. Use our weight calculator for exact numbers by concrete type. This weight matters when calculating dead loads for structural engineering.
Yes — place 4–6 inches of compacted gravel at the bottom of every post hole before the Sonotube or concrete. The gravel provides drainage so water does not pool under the footing, which prevents frost heave in cold climates and reduces soil moisture contact that can degrade concrete over decades.
Yes — fast-setting concrete (like Quikrete Fast-Setting or Sakrete Fast Setting) is ideal for fence posts and small columns. It sets in 20–40 minutes, which means you can attach fence rails the same day. However, for structural columns deeper than 3 feet, standard concrete is better because you have more time to rod and consolidate each lift. Fast-setting concrete in a deep column can start hardening before you finish filling it.