Concrete Curing Time Guide 2026 — How Long to Wait Before Loading
Whether you just poured a driveway, a garage slab, or a set of footings, the single most important question is: how long do I wait before I walk on it, drive on it, or build on it? Get the timing wrong and you risk permanent cracks, surface scaling, and a slab that never reaches full strength.
This guide gives you exact timelines — by activity, by concrete type, and by weather condition — so you know precisely when your pour is safe to load. Every number below is grounded in ACI 308R (Guide to External Curing of Concrete) and real-world contractor practice.
What Is Concrete Curing — and Why Does It Matter?
Curing is the process of keeping freshly poured concrete moist and at the right temperature so the cement and water can react (a chemical process called hydration). Curing is not drying. In fact, curing and drying are opposite goals — concrete that dries out too fast ends up weaker, not stronger.
Here is why curing matters:
- Strength development: Properly cured concrete reaches its full design strength (measured as f’c, typically 3,000–4,000 PSI for residential work). Concrete that is not cured can lose 40–50% of its potential strength.
- Crack resistance: Rapid moisture loss causes plastic shrinkage cracks within the first 1–6 hours and drying shrinkage cracks within the first few weeks.
- Surface durability: The top ¼ inch of a slab is the most vulnerable. Poor curing creates a dusty, chalky, weak surface that spalls and flakes under traffic.
- Freeze-thaw resistance: Uncured concrete absorbs more water and deteriorates faster in winter climates.
The American Concrete Institute (ACI 308R) recommends a minimum of 7 days of moist curing at 50°F or above for standard Type I/II cement. That 7-day window is when hydration is most active — skip it and the damage is permanent.
Concrete Curing Time Chart — When Can You Walk, Drive, and Load?
This is the chart most people are looking for. It tells you exactly when each activity is safe based on standard Type I/II cement at 65–75°F with proper moist curing.
| Activity | Minimum Wait Time | Approximate Strength | Notes |
|---|---|---|---|
| Remove finishing tools | 4–8 hours | 5–10% f’c | Initial set complete |
| Walk on it (foot traffic) | 24–48 hours | ~16% f’c (~500–650 PSI) | Light foot traffic only — no dragging heavy items |
| Remove forms | 2–3 days | ~30–40% f’c | Leave longer in cold weather (<50°F) |
| Place light furniture / patio items | 3–5 days | ~40–50% f’c | Distribute weight with plywood if needed |
| Drive a car or pickup truck | 7 days | ~65–75% f’c (~2,500 PSI) | Standard passenger vehicles only |
| Drive a heavy truck / SUV | 10–14 days | ~80–90% f’c | Includes delivery trucks and loaded trailers |
| Park an RV or heavy equipment | 28+ days | 100% f’c (full design strength) | Static loads concentrate stress — wait for full cure |
| Full structural loading | 28 days | 100% f’c | Build walls, pour upper floors, or apply rated loads |
Important: These timelines assume ideal conditions (65–75°F, moist cured, standard 4,000 PSI mix). If temperatures drop below 50°F, add 50–100% more time to every line in this chart.
Concrete Strength Gain by Day — The 28-Day Curve
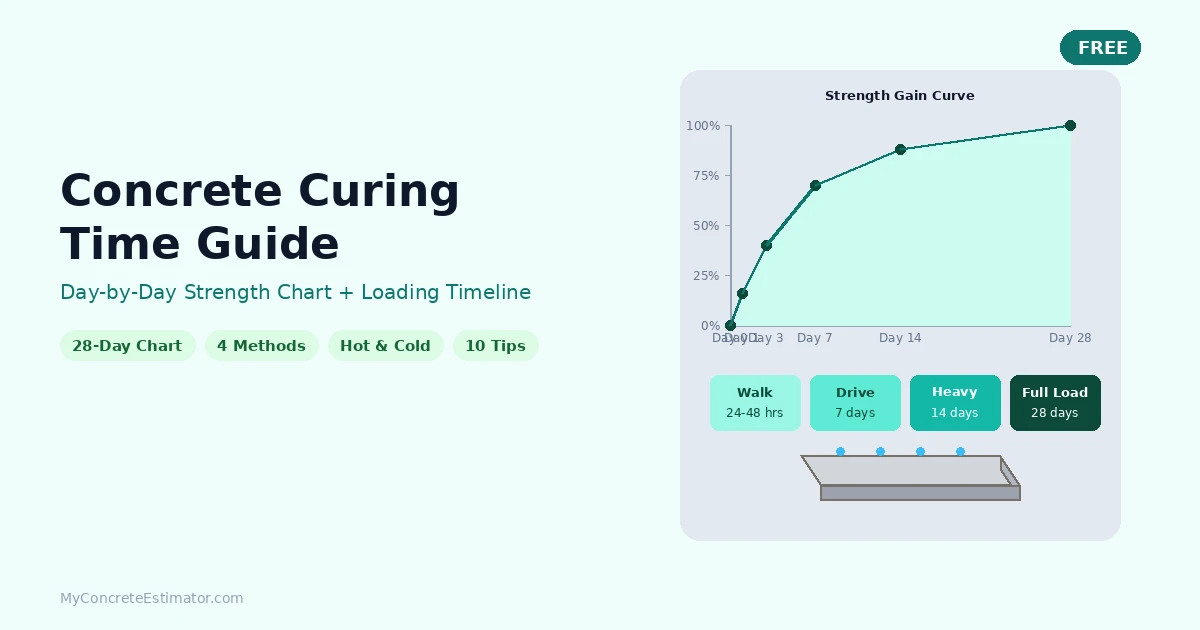
Concrete does not gain strength in a straight line. Most of the strength develops in the first 7 days, then gradually slows. Here is the typical strength gain curve for Type I/II cement at 70°F:
| Day | % of Design Strength (f’c) | Approx. PSI (4,000 PSI Mix) | What This Means |
|---|---|---|---|
| 1 | 16% | ~640 PSI | Foot traffic safe |
| 3 | 40% | ~1,600 PSI | Forms can come off |
| 7 | 65–75% | ~2,600–3,000 PSI | Light vehicles, ACI minimum cure met |
| 14 | 85–90% | ~3,400–3,600 PSI | Heavy vehicles safe |
| 28 | 99–100% | ~4,000 PSI | Full design strength — structural loading OK |
| 56 | ~110% | ~4,400 PSI | Hydration continues slowly but gain is negligible |
| 90+ | ~115% | ~4,600 PSI | Final measurable gain for most mixes |
Notice the steep curve: you get roughly 75% of the total strength in just 7 days, but the last 25% takes another 21 days. That is why rushing the timeline is so risky — the concrete feels hard and looks ready long before it actually is.
6 Factors That Affect Concrete Curing Time
Not every pour cures on the same schedule. These six variables can speed up or slow down the process dramatically.
1. Temperature
Temperature is the single biggest factor. Hydration is a chemical reaction, and reactions speed up in heat and slow down in cold.
| Temperature Range | Effect on Curing | Practical Impact |
|---|---|---|
| Below 32°F (0°C) | Hydration stops; water in pores can freeze | Permanent damage if concrete has not reached 500 PSI |
| 32–50°F (0–10°C) | Hydration runs at ~50% speed | 28-day strength may take 45–60 days |
| 50–85°F (10–29°C) | Optimal curing range | Standard timelines apply |
| 85–100°F (29–38°C) | Accelerated set; rapid moisture loss | Higher cracking risk; more aggressive curing needed |
| Above 100°F (38°C+) | Flash set possible; strength loss | ACI 305R hot-weather precautions required |
2. Humidity and Wind
Low humidity and high wind accelerate surface evaporation. When the evaporation rate exceeds 0.2 lb/sq ft/hour (the traditional ACI threshold), plastic shrinkage cracks become likely. Modern high-performance mixes can crack at rates as low as 0.05–0.10 lb/sq ft/hour.
Wind breaks, fog spraying, and evaporation retarders help in dry or windy conditions.
3. Cement Type
Different cement types hydrate at different rates:
| Cement Type | Hydration Speed | Typical Use |
|---|---|---|
| Type I (General Purpose) | Standard | Most residential slabs, driveways, footings |
| Type II (Moderate Sulfate Resistance) | Standard | Foundations in sulfate-rich soil |
| Type III (High Early Strength) | Fast — reaches 7-day strength in ~3 days | Cold weather pours, fast-track projects |
| Type IV (Low Heat) | Slow — takes 45–60 days for full cure | Mass concrete (dams, thick footings) |
| Type V (High Sulfate Resistance) | Slow | Aggressive soil/water environments |
4. Water-to-Cement Ratio (w/c)
A lower w/c ratio produces stronger, denser concrete but is harder to place and finish. Standard residential mixes use a w/c of 0.45–0.55. Higher ratios (more water) weaken the final product and extend drying time — but do not significantly change curing time since curing depends on hydration, not evaporation.
5. Slab Thickness
Thicker slabs take longer to reach a uniform temperature and moisture profile throughout their depth. While surface curing timelines stay roughly the same, the interior of a thick slab cures more slowly.
| Slab Thickness | Walkable | Light Vehicles | Full Strength |
|---|---|---|---|
| 2 inches | 12–24 hours | 3–5 days | 28 days |
| 4 inches (standard) | 24–48 hours | 7 days | 28 days |
| 6 inches | 24–48 hours | 7–10 days | 28 days |
| 8+ inches | 48–72 hours | 14 days | 28–56 days |
6. Admixtures and Additives
Chemical admixtures alter curing speed directly:
- Accelerators (calcium chloride, non-chloride accelerators): Speed up set and early strength gain by 30–50%. Used in cold weather.
- Retarders: Slow the set by 1–4 hours. Used in hot weather to prevent flash setting.
- Water reducers / plasticizers: Allow a lower w/c ratio without losing workability, producing stronger concrete at the same cure time.
- Fly ash / slag cement: Slow early strength gain but improve long-term strength and durability. 28-day tests may need to extend to 56 days.
Curing Time by Concrete Type
Not all concrete is the same bag at the hardware store. Here is how cure times differ across common concrete products.
| Concrete Type | Initial Set | Walkable | Drive On | Full Strength | Common Use |
|---|---|---|---|---|---|
| Standard (Type I/II) | 4–8 hrs | 24–48 hrs | 7 days | 28 days | Slabs, driveways, footings |
| High-Early Strength (Type III) | 2–4 hrs | 10–12 hrs | 3–5 days | 14–21 days | Cold weather, fast-track jobs |
| Rapid Set / Fast Setting | 15–45 min | 1–4 hrs | 24 hrs | 7 days | Post holes, small repairs, anchors |
| Self-Leveling | 2–6 hrs | 4–6 hrs | N/A (interior floors) | 28 days | Floor overlays, leveling uneven slabs |
| Fiber-Reinforced | 4–8 hrs | 24–48 hrs | 7 days | 28 days | Crack-resistant slabs, sidewalks |
| High-Performance (5,000+ PSI) | 4–8 hrs | 24 hrs | 5–7 days | 28 days | Structural, commercial, high-load areas |
| Fly Ash / Slag Blend | 6–12 hrs | 48–72 hrs | 10–14 days | 56 days | Eco-friendly, mass pours, foundations |
Quikrete Fast-Setting Concrete Mix is the most commonly used rapid-set product for homeowners. It sets in 20–40 minutes and reaches walkable strength in 1–2 hours — but it is only practical for small pours like fence posts, not full slabs.
How to Cure Concrete Properly — 4 Methods Step by Step
There is no single “right” way to cure concrete. The method depends on the project size, weather, and whether you are a contractor or a homeowner. Here are the four most common curing methods used in residential and light commercial work.
Method 1: Water Curing (Ponding or Continuous Spraying)
This is the gold standard. Keeping the surface continuously wet for 7 days produces the strongest concrete.
- Wait for the bleed water to disappear and the surface to lose its sheen (usually 30–90 minutes after finishing).
- Begin misting or spraying the surface gently with a garden hose. Do not blast — you will damage the soft surface.
- Keep the surface visibly wet at all times for 7 days. Set a sprinkler on a timer if needed — 5–10 minutes every hour during the day works for most climates.
- In flat areas, you can pond water by creating a small earth dam around the slab edges and flooding the surface with 1–2 inches of water.
Pros: Best strength results, cheapest method (just water), no chemicals on the surface.
Cons: Labor-intensive, easy to forget, impractical in freezing temperatures or on slopes.
Method 2: Wet Burlap or Cotton Mats
A contractor favorite for slabs that cannot be ponded.
- Soak burlap sheets or curing blankets in water before placing.
- Lay them on the surface as soon as finishing is complete and the surface can take the weight without marking.
- Re-wet the burlap 2–3 times per day (more often in hot or windy weather). The burlap should never dry out completely.
- Cover the burlap with polyethylene sheeting to slow evaporation from the burlap itself.
- Keep in place for 7 days minimum.
Pros: Even moisture distribution, works on slopes and formed surfaces, very effective.
Cons: Burlap can discolor light-colored concrete, needs frequent re-wetting.
Method 3: Plastic Sheeting (Polyethylene)
The easiest method for homeowners.
- Wait until finishing is complete and the surface will not be marred by contact.
- Lay 4-mil (minimum) polyethylene sheeting directly on the concrete surface. Use clear or white sheeting — black absorbs heat and can overheat the surface.
- Overlap seams by at least 12 inches and tape or weight down all edges so wind cannot lift the sheet.
- Leave in place for 7 days. Check periodically — condensation on the underside confirms the sheet is doing its job.
Pros: Cheap, minimal labor, readily available at any hardware store.
Cons: Can cause mottled discoloration on decorative concrete (moisture collects unevenly under the sheet), not ideal for stamped or colored work.
Method 4: Liquid Curing Compound (Membrane Cure)
The most common method for contractors on large pours.
- Wait for all bleed water to evaporate from the surface.
- Apply the curing compound using a pump sprayer at the manufacturer’s recommended rate — typically 150–200 sq ft per gallon.
- Apply in two passes at right angles to each other for even coverage. One thin coat is not enough.
- Allow the compound to form a visible membrane. It appears as a slight sheen or white haze on the surface.
- Do not disturb the membrane for 28 days. If it gets damaged, recoat the affected area.
Pros: One-time application, no daily attention, works on any surface shape or slope.
Cons: Costs $15–$30 per 5-gallon bucket (covers 750–1,000 sq ft), must be removed or worn off before applying sealers, paint, or tile adhesive.
Curing Method Comparison Table
| Method | Effectiveness | Labor | Cost | Best For | Watch Out For |
|---|---|---|---|---|---|
| Water curing / ponding | Excellent | High (daily attention) | Free (water only) | Flat slabs, patios, sidewalks | Cannot forget — even 1 dry day hurts |
| Wet burlap + poly | Excellent | Moderate | $0.15–$0.30/sq ft | Formed walls, slopes, contractor jobs | Burlap can stain light concrete |
| Plastic sheeting | Good | Low | $0.02–$0.05/sq ft | Homeowner DIY, small slabs | Mottled discoloration on colored concrete |
| Liquid curing compound | Good to Excellent | Low (one application) | $0.03–$0.05/sq ft | Large pours, driveways, commercial | Must be removed before sealing or coating |
My recommendation: For a homeowner pouring a driveway or patio, plastic sheeting is the easiest and most reliable method. For contractors doing commercial work, liquid curing compound saves the most labor. Water curing gives the best results but requires commitment.
Curing in Hot Weather vs. Cold Weather
Weather changes everything about curing. The same mix that works perfectly in spring can fail in August or January if you do not adjust.
Hot Weather Curing (Above 85°F / 29°C)
ACI 305R (Hot Weather Concreting) kicks in when ambient temperature exceeds 85°F or the concrete temperature exceeds 90°F. Challenges include:
- Rapid evaporation: Surface moisture can disappear faster than it rises from within the slab, causing plastic shrinkage cracks.
- Fast set time: The concrete may set 30–50% faster than normal, reducing your finishing window.
- Higher water demand: Workers are tempted to add water at the jobsite, which weakens the mix.
Hot weather curing strategies:
- Pour early in the morning (before 10 AM) or in the evening.
- Use a retarding admixture to slow the set.
- Apply an evaporation retarder (monomolecular film) immediately after screeding — this buys 30–60 minutes of protection.
- Begin curing immediately after finishing. Use fogging or misting — do not let the surface dry for even 30 minutes.
- Use white or reflective curing compound to reflect heat.
- Shade the pour area with temporary canopies if possible.
Cold Weather Curing (Below 50°F / 10°C)
ACI 306R (Cold Weather Concreting) applies when ambient temperature drops below 40°F for any part of the first 3 days after placing. Challenges include:
- Slow hydration: At 40°F, hydration runs at roughly half its normal rate. At 32°F, it stops entirely.
- Freeze damage: If concrete freezes before reaching 500 PSI (~1 day at 70°F), the ice crystals destroy the internal structure permanently. The slab will never reach design strength.
- Extended cure time: A 28-day cure at 70°F may take 45–60 days at 40°F.
Cold weather curing strategies:
- Use Type III (high-early strength) cement or add a non-chloride accelerator to the mix.
- Heat the mixing water and aggregates — never add hot water to dry cement directly.
- Protect the slab with insulating blankets (not just plastic) for at least 3 days. Electric curing blankets are the fastest option — up to 2.8× faster than passive insulation.
- Maintain concrete temperature above 50°F for at least 7 days.
- Do not remove blankets suddenly — gradual cool-down prevents thermal cracking.
- Never use calcium chloride accelerator in reinforced concrete — it causes rebar corrosion.
10 Tips for Faster (and Better) Concrete Curing
These are practical tips you can actually use on your next pour — not textbook theory.
1. Start Curing Immediately After Finishing
The most common mistake is waiting too long. As soon as the bleed water disappears and the surface loses its sheen, begin your curing method. Even a 30-minute gap in hot weather can cause surface cracks.
2. Use the “70 in 7” Rule as Your Baseline
Properly cured concrete reaches approximately 70% of its design strength in 7 days. If you are in a hurry, this is the minimum threshold for most light-duty loading.
3. Choose Type III Cement for Cold Weather Pours
Type III (high-early strength) cement reaches 7-day strength in about 3 days. It costs 10–15% more than Type I but can save you a week of waiting in cold conditions.
4. Add a Non-Chloride Accelerator in Winter
Products like Fritz-Pak NCA or Sika Rapid-1 can speed up early strength gain by 30–50% without the corrosion risk of calcium chloride. Safe for use in all reinforced concrete.
5. Never Add Water to Ready-Mix at the Jobsite
Every extra gallon of water per cubic yard reduces strength by 150–200 PSI and increases drying shrinkage. If the mix is too stiff, ask the driver to add mid-range water reducer instead.
6. Cover the Slab Within 30 Minutes in Windy Conditions
Wind evaporates surface moisture faster than heat does. If wind speeds exceed 15 mph, apply an evaporation retarder or cover with plastic immediately after bull-floating.
7. Use White or Clear Curing Compound — Never Black
Black plastic sheeting or dark curing compounds absorb solar heat and can overheat the surface, causing thermal cracking. Always use white, clear, or reflective products.
8. Cure for 7 Days Minimum — 14 Is Better
ACI requires 7 days minimum for Type I/II cement. Extending to 14 days adds another 10–15% strength and significantly improves surface durability and freeze-thaw resistance.
9. Mist the Surface Before Applying Curing Compound
If the surface has started to dry before you can spray the compound, mist it lightly first. Applying compound over a dry, absorbent surface wastes material — it soaks in instead of forming a membrane.
10. Test Concrete Strength with Cylinders — Not Time Alone
For structural work, never assume 28 days = full strength. Have test cylinders cast at the time of pour and break-tested at 7 and 28 days. This is the only way to confirm the concrete actually reached its rated f’c.
8 Common Concrete Curing Mistakes to Avoid
1. Letting the surface dry in the first 24 hours.
This is the number one curing failure. Concrete needs moisture to hydrate. If the surface dries out on day one, it forms a weak, dusty layer that will flake and scale under traffic.
2. Walking on it too soon.
You can walk on concrete after 24 hours in warm weather — but many homeowners step on it at 8–12 hours. At that point the surface is firm enough to hold a footprint, but the print is permanent.
3. Driving on it at 3–5 days.
A car weighs 3,000–5,000 lbs concentrated on four small tire patches. At 3 days the slab is only at ~40% strength. You need 7 days minimum for passenger vehicles.
4. Pouring in extreme heat without precautions.
If it is 95°F and you pour at noon with no evaporation retarder, you will almost certainly get plastic shrinkage cracks before you can even start curing.
5. Using too much water in the mix.
Adding water at the jobsite is the most common concrete quality failure. It is easier to place but the final product is permanently weakened.
6. Removing forms too early.
Forms support the concrete edges. Remove them before 2–3 days and the edges can chip, crumble, or deform under their own weight.
7. Sealing too early.
Applying a sealer over concrete that has not fully cured (28 days) traps moisture inside, causes whitening (blushing), and prevents the sealer from bonding properly. Wait 28 days — no exceptions.
8. Skipping curing entirely.
Many homeowners pour concrete and walk away. The concrete will still harden — but it will reach only 50–60% of its potential strength. Moist-cured concrete is up to 50% stronger than uncured concrete at 28 days.
Curing Time for Common Residential Projects
| Project | Typical Thickness | Walk On | Drive On | Full Load / Build On |
|---|---|---|---|---|
| Sidewalk | 4 inches | 24 hrs | N/A | 28 days |
| Patio | 4 inches | 24–48 hrs | N/A | 7 days (furniture) |
| Driveway | 5 inches | 24–48 hrs | 7 days (car), 14 days (truck) | 28 days (RV, heavy equipment) |
| Garage slab | 5–6 inches | 24–48 hrs | 7–10 days | 28 days |
| Fence post (Quikrete) | N/A | N/A | N/A | 4 hours (hang gate after 24 hrs) |
| Foundation footing | 8–12 inches | 48–72 hrs | N/A | 7 days (start framing), 28 days (full load) |
| Stamped concrete | 4–5 inches | 48–72 hrs | 10–14 days | 28 days (seal after 28 days) |
Final Thoughts
Concrete curing is not complicated — but it does require patience. The biggest mistake homeowners and even some contractors make is treating concrete like it is “done” because it looks hard. In reality, that gray surface is only at 16% of its ultimate strength after 24 hours.
Follow the 7-day minimum moist cure, respect the loading timelines in the charts above, and your slab will perform for 30–40 years with minimal maintenance.
If you are planning a new driveway, patio, or slab and want to estimate your total project cost including materials, labor, and curing products, try our Slab Cost Estimator or Driveway Cost Estimator — both are free and give you itemized pricing in under 60 seconds.
Standard concrete (Type I/II cement at 70°F) reaches about 75% of its design strength in 7 days and 100% at 28 days. You can walk on it after 24–48 hours, drive a car after 7 days, and apply full structural loads after 28 days. Curing continues slowly beyond 28 days but the gains are negligible.
You can walk on new concrete after 24 to 48 hours in normal weather conditions (65–75°F). At this point the concrete has reached approximately 500–650 PSI (about 16% of its design strength). In cold weather below 50°F, wait at least 48–72 hours. Avoid dragging heavy objects across the surface during this period.
Wait at least 7 days before driving a standard car or pickup truck on new concrete. For heavy vehicles like delivery trucks, SUVs towing trailers, or loaded pickups, wait 10–14 days. For RVs, dumpsters, or heavy equipment, wait a full 28 days. These timelines assume standard 4,000 PSI concrete at 65–75°F with proper curing.
Curing and drying are opposite processes. Curing means keeping concrete moist so cement and water can react chemically (hydration) to build strength. Drying means moisture is leaving the concrete. Concrete that dries too fast cures poorly and ends up weaker. You want to prevent drying during the first 7 days to ensure proper curing.
Hot weather (above 85°F) accelerates the initial set — concrete hardens faster on the surface. But faster is not better. Rapid surface drying causes plastic shrinkage cracks and can actually reduce final strength by 10–15%. In hot weather, you need more aggressive curing (continuous misting, evaporation retarders) to keep moisture in the slab.
In cold weather (below 50°F), use insulating blankets or electric curing blankets to maintain concrete temperature above 50°F for at least 7 days. Use Type III high-early strength cement or add a non-chloride accelerator to the mix. Never let fresh concrete freeze before it reaches 500 PSI — freezing at that stage causes permanent, irreversible damage to the internal structure.
Improperly cured concrete can lose 40–50% of its potential strength. The surface becomes dusty, chalky, and prone to scaling and spalling. Cracks appear earlier and more frequently. The slab absorbs more water, making it vulnerable to freeze-thaw damage in cold climates. Moist-cured concrete is up to 50% stronger than concrete that was left to dry on its own.
ACI 308R recommends a minimum of 7 days of continuous moist curing for standard Type I/II cement at 50°F or above. For best results, extend to 14 days — this adds an extra 10–15% strength and significantly improves surface durability. For Type III high-early strength cement, 3 days of moist curing is usually sufficient.
Yes — there are several proven ways. Use Type III high-early strength cement (reaches 7-day strength in 3 days). Add a non-chloride accelerator to the mix (speeds set by 30–50%). Use electric curing blankets in cold weather (2.8× faster than passive insulation). Use rapid-set concrete for small projects like fence posts (sets in 20–40 minutes). You cannot, however, speed up full 28-day design strength — hydration takes time.
The 28-day rule means that standard concrete (Type I/II cement) reaches its rated design strength (f’c) after 28 days of curing under ideal conditions. This is the industry-standard testing age — concrete test cylinders are broken at 28 days to verify they meet the specified PSI. Concrete does continue gaining strength after 28 days, but the gains are small (roughly 10–15% more by 90 days).
At 7 days, properly cured concrete reaches 65–75% of its 28-day design strength. For a 4,000 PSI mix, that is approximately 2,600–3,000 PSI at 7 days and 4,000 PSI at 28 days. The first 7 days account for the steepest part of the strength curve — the remaining 25–35% takes another 21 days to develop.
It depends on timing. Rain on fresh concrete (within the first 4–8 hours) can wash out cement paste, pit the surface, and cause serious damage. Rain after 4–8 hours (once initial set is complete) is generally harmless and may actually help keep the surface moist for curing. Heavy downpours on semi-fresh concrete can weaken the surface layer — cover the slab with plastic sheeting if rain is forecast within 12 hours of your pour.
No — wait a full 28 days before applying a sealer. Applying sealer too early traps moisture inside the slab, which causes whitening (called blushing), prevents the sealer from bonding properly, and can lead to peeling. A curing compound is not the same as a sealer — curing compounds are applied immediately but must be removed or worn off before you can seal. Penetrating sealers are more forgiving than film-forming sealers, but 28 days is still the standard.
Quikrete standard mix (No. 1101) sets in 4–8 hours and reaches full strength in 28 days — same as any standard Type I/II concrete. Quikrete Fast-Setting Concrete Mix (No. 1004) sets in 20–40 minutes, is walkable in 1–2 hours, and reaches functional strength in 4 hours. It reaches full rated strength in about 7 days. Fast-setting mix is designed for fence posts, mailboxes, and small repairs — not full slabs.
Surface curing timelines stay about the same regardless of thickness — you can walk on a 6-inch slab after 24–48 hours just like a 4-inch slab. But the interior of thick slabs (8 inches or more) takes longer to reach full strength because the heat of hydration builds up inside and the core maintains moisture longer. For mass concrete (footings thicker than 12 inches), full cure may take 56 days instead of 28.